Kup stronę 60% Taniej
BLACK MONTH
BLACK MONTH
Do końca 2 DNI : 2 GODZIN : 2 MINUT : 2 SEKUND

Categories.
![]()
WebWave drag and drop website builder lets you create unique websites. You can build your website from scratch by starting with a blank page, or choose various website templates from our free collection and modify them according to your needs. With WebWave website builder, you have a complete website design and hosting system at your fingertips.
This website was created with WebWave.
Find us online
Contact.
Email us at:
contact@webwave.me
Or use the chat (Mon-Fri)
Website builder.
Offer.
Useful articles.
Online store in WebWave
Store settings:
1. General
2. Payment
3. Shipping
4. Promotions
5. Personalization
List of products
Order list
"Add to cart" button
"View cart" button
Store settings
To go to the store settings hover over the "Store" tab located in the bar on the top left, then click "Store Settings".
1. General
Currency.
You can set one of many currencies in the store, or add your own using the "other" function in the drop-down list:

TAX (%).
Set a default VAT for all your products. The standard rate (15%) applies to all products and services, except those that are either exempt or subject to a reduced rate of 8%, 5% or 0%.
If you are issuing a VAT invoice, check the option "I issue VAT invice".

E-mail to the shop assistant.
By default, orders are sent to the e-mail address of the site owner, while we can easily change the e-mail address that will be used for order processing.

Store terms and conditions.
1. Add store terms and conditions to your store to inform your customers about the rules during purchase, to add store terms/conditions select "Store terms and conditions" option, then click "Add store terms and conditions" button.

2. Fill in all fields according to your preferences.

Name - give a name to your terms and conditions (only visible in the store settings).
Content - this is the content displayed in the 2nd step of the order.
The condition is required - if you check this option, the customer will not go to the summary if he does not check the content of the store's terms and conditions in the 2nd step of the order.
Link to page - in this item we set the link to the subpage with the terms and conditions of our store.
3. Click "Save" to accept your settings.
Example:

Minimum cart amount.
You sell small products by the piece, set a minimum cart amount so that your customers will not be able to place an order below the break-even point.

2. Payment
We have the ability to connect two payment gateways to our system - they allow us to collect payments through different payment methods - each payment gateway has different payment methods.
To start collecting payments for products via gateways, press "Add payment method". Select a payment method from the drop-down list:

Attention! You can integrate Stripe and Paypal payment gateways
3. Shipping
Choosing a shipping option is a great perk. Some prefer a courier, others a parcel service and still others pick it up in person at the store. The WebWave shopping cart allows you to set any form of delivery. In the store settings, go to the "Shipping" tab then click the "Add shipping method" button.

Edit and delete
To edit or delete a shipping method, click on the three dots next to the method name, then click "Edit" or "Delete postage method" - select the option that interests you at the moment.

Postage Type.

Carriers - add the names of your carriers, let the customer choose the right one.
InPost EasyPack - selecting this function provides a map of parcel machines that are available in your location.
Electronic - when selecting this function, the form for the order will be changed, this form will consist of "Buyer's details", "Payment method", "Contact details".
Self pickup - selecting this option allows the customer to pick up the product at a local store.

1. Name - give a name to your method.
2. gross price - enter the gross price of your shipment.
3. VAT tax % - give VAT for your shipment.
4. Availability for payment - give availability for specific payments, there are 3 options to choose from:
- All payment methods
- Only when paying online
- Only on delivery
5. Description - optional description of the shipping method.
6. Check the weight of product - specify the minimum weight and maximum weight of the product for a given shipping method.
7. Possibility to ship only to certain countries - select the area in which you operate and enable shipping of your products to certain countries
4. Promotions
Discount codes.
Add a discount code to your basket to encourage your customers to buy, to add a discount code go to "Discounts" then "Add discount code".

Fill in all fields according to your preferences.

1. Code - write the name of your code, which customers will enter in the 3rd step of the order.
2. Discount in % - write the percentage value of your code.
3. Maximum number of uses - optionally add the amount of maximum number of uses, the standard value is: "Unlimited".
4. Expire date - set the validity of your code
Free delivery.
Encourage your customers to buy more from your site.

1. Move the slider "Serve free shipping".
2. Enter the price from which free shipping of products is possible.
5. Personalisation
Customized cart colors.

1. Header color - change the color of your online store's header.
2. Header background color - change the background color for the header.
3. Button color - change the color of the navigation button.
4. Overview - preview the appearance of your cart after making changes.
Additional form fields.
To add an additional field in the form, click the "Add field" button, they will allow the customer to add additional information to the order.

1. Field type - this setting allows you to select the size of the displayed field for placing information. We have a choice of two field types: Text box - one line, and Text box - multiple lines.
2. Label - the name of the field, which is displayed as the title of the text field.
3. Required - determine whether the field is required to be filled in or not.
The label and field will be visible under the email address in the second step of the order "Contact details".
Example:

Own translations in the cart.
You can easily change your labels for any language version of your shopping cart(for EN version too). To add your own labels, go to "Personalization" tab, then click "Edit".

The next step will be to edit the individual labels:

1. Search for the label you want to change.
2. Select the label you want to change.
3. Orginal text - the selected text to change.
4. Translation - your translation of the selected text.
To save your labels click "Save".
Additional options.

1. Information visible when the customer confirms the order - In this step you can write, enter additional information when the customer confirms his order. This information will be displayed in the 3rd step of the order.

Example information:

2. Information visible after a purchese - In this step you can thank your customer for placing an order on your store.

Example information:

3. Redirect after successful purchase - redirect your customer after a successful purchase to any subpage on your site, you can also choose to redirect to another language page.

Products
How to use the Product List.
1. Go to edit your website.
2. On the top left bar find the "Store" tab, from the drop-down list go to the "Products" tab.

3. After clicking on the "Products" tab, we will be shown a list of products that currently exist in our store.
Functionalities found in the Products tab.

1. Product search engine - allows us to easily search for a product by name.
2. Product Sorting - allows us to filter products by the following filters:

• All - shows all products that we have in our product list.
• Available - shows products that have quantity of pieces >1 and products that have availability set to "Available".
• Low quantity (1-5 pieces) - shows products that have a low stock of 1 piece to 5 pieces.
• Unavailable - shows products that have quantity of pieces = 0 and products that have availability set to "Unavailable".
3. Add product - a button that allows from the "Products" tab to add another product to our store.
4. Expanded list of variants - if our product has variants, they will also be displayed after clicking the arrow icon.
5. Quantity - is used to update the number of pieces in stock.
6. Edit - is used to edit products.
7. Duplicate - duplicate your product (when duplicating, all product data will be duplicated).
8. Delete - this button allows you to delete a given product.
9. Finish - allows you to exit the list of products.
WebWave's order list is a tool that allows you to effectively manage your orders within the online platform. With this functionality, you can easily monitor, organize and process orders.
Orders
1. Go to edit your page.
2. Under the "Store" tab, select the "Orders" button.

Order list functionalities.
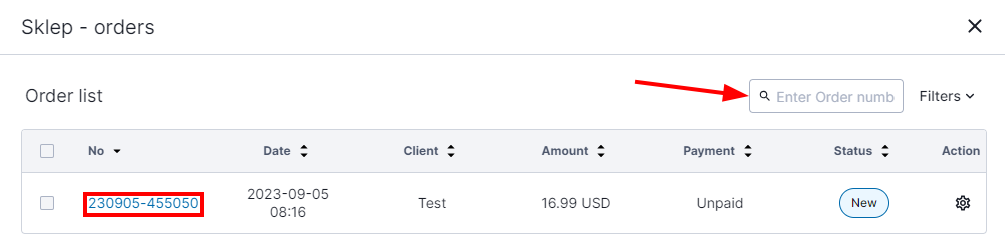
Search:
Enter the order number you want to find. The order number is received by email, and the customer also receives it.
Filtering:
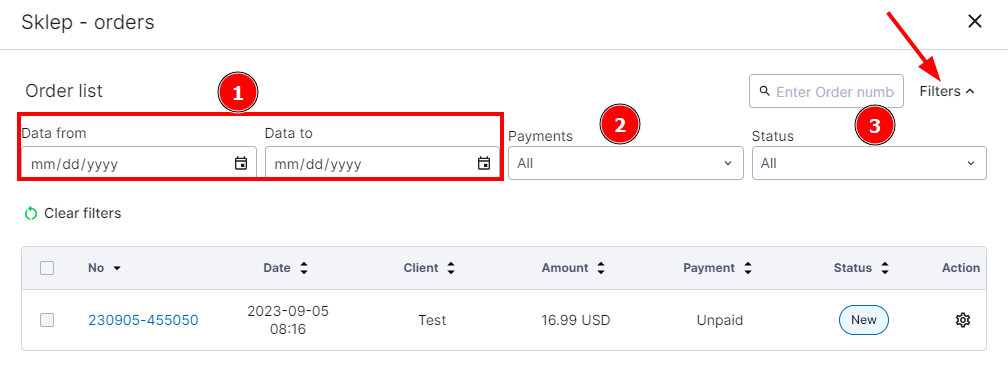
- Date from & Date to - select the date range you are interested in, the system will automatically show you the orders from the selected period
- Payments - sort by payment status, we distinguish 5 statuses - "Unpaid", "Paid", "Underpaid" and "Overpaid".
- Status - Sort order by completion status, distinguish 5 statuses - "New", "In progress", "Completed" and "Cancelled".
- Clear filters - all set filters return to default settings.
Set status:
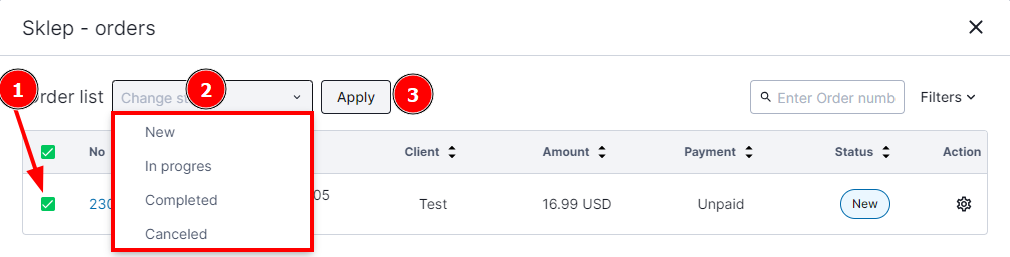
1. select the order in which you want to change the status.
2. select the status for the selected orders, there are 5 statuses - "New", "In progress", "Completed" and "Cancelled".
3. Click "Apply" to save your settings.
Note: We can select more than one order and change the status globally.
Order details:
1 Click on the order number in the "No." column or on the gear icon in the "Action" column.

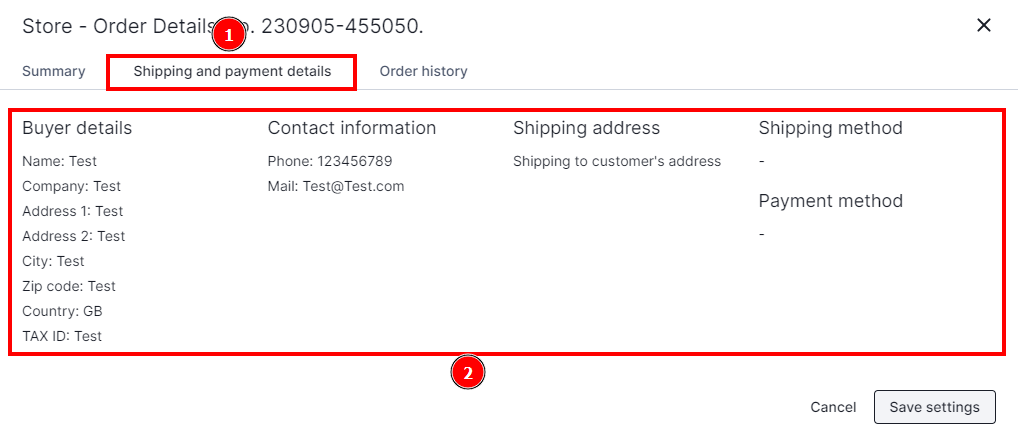
2.In the newly opened "Summary" window (1), you have the option to change the "Payment Status" (2) and "Order Status" (3) and order summary(4).
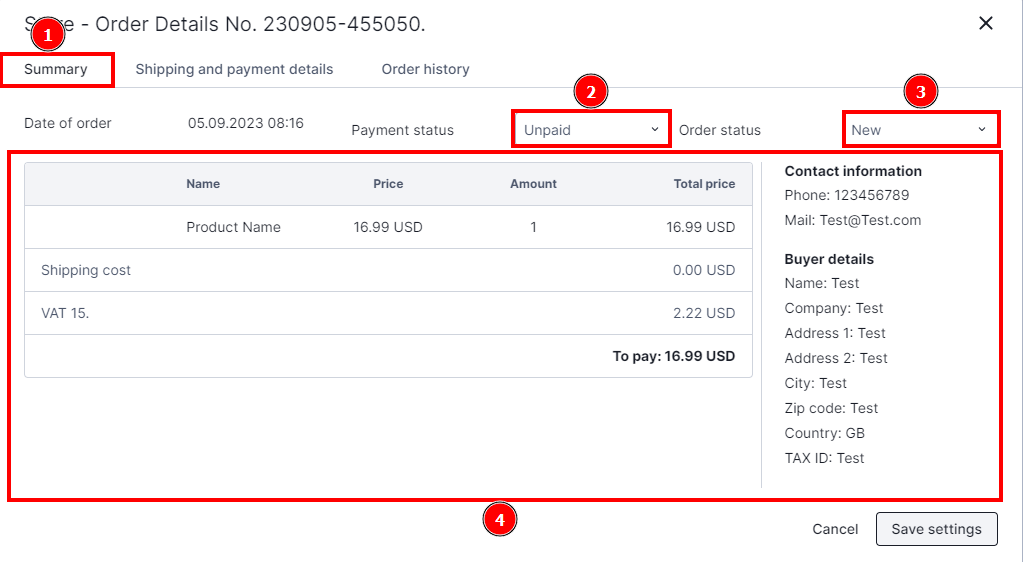
3. When you go to the "Shipping and payment details" tab (1), you will receive information about shipping details, shipping method and payment method (2).
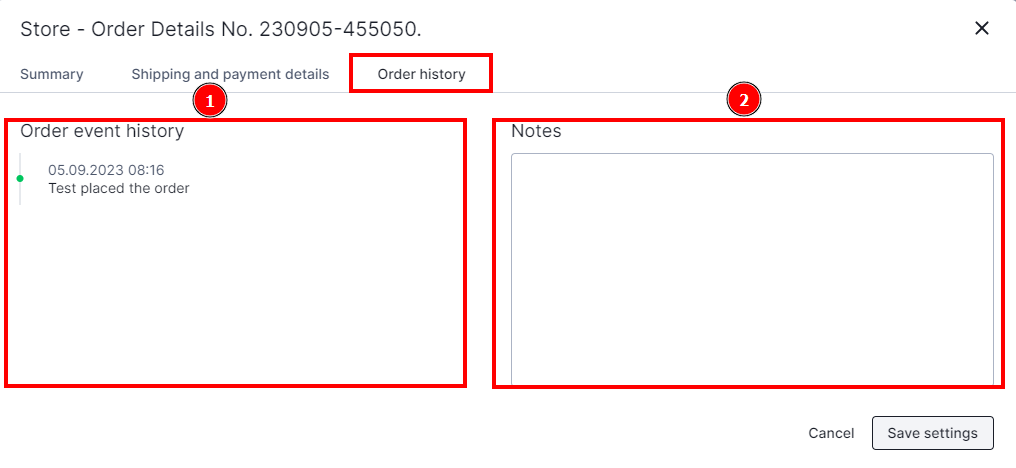
4."Order history" - allows us to verify the process in accordance with the company's process. On the displayed "Process Flow" we can observe the changes made to the order status (1), and add our own comments/notes (2).
Settings for the "Add to cart" item
Add a product.
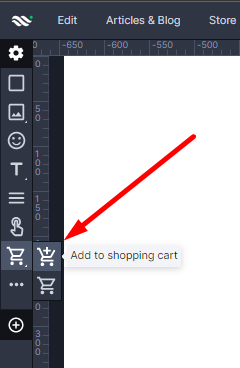
1. Select "Add to shop cart" button from the toolbar on the left side of the builder.
2. Enter the product name, price, description, thumbnail, you can also send a message after purchase.


- Availability - set the availability of your product in stock.
- Delete - button that allows you to delete the product.
- Thumbnail - optionally, you can add a thumbnail of your product, which will be displayed in the cart. preview, the 3rd step of your order and in the sent order summary email.
- Product name - define the name of your product, which will be displayed during ordering.
- Gross price - assign the price of the product.
- TAX % - if a different vat is applicable for the service/product, enter it here.
- Product description - add a description of your product, which will be displayed in the 3rd step of the order under the product name.
- URL address - address where the product card will be available on the website.
- Product categories - here you can specify product categories, categories can be used to filter products displayed in product lists.
- Message sent after purchase - in this step you can add an additional message to the customer, which will appear in the order summary email sent, e.g. a link to a digital product.
- Product variations - adding product variations allows us to sell one product in different sizes or colors without having to create a separate article for each variation
- Track quantity - set the quantity of the product in your inventory.
- Specify shipping method - select a shipping method for your product, this feature allows you to sell digital products as well as physical products on one page.
- Specify weight - specify the weight of your product so that the customer can choose the appropriate shipping method depending on the weight.
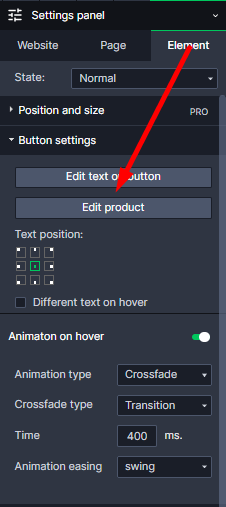
Edit existing product.
1. Select a button, which is assigned to the product.
2. In Settings Panel go to "Edit product".
Edit button style.
Add to shop cart button has exactly the same features as a regular button. If you still don't know how to edit it, read an article on button element in WebWave.
View shop cart button
Button "View shop cart".
In order to add this button to a website, select its icon in the toolbar on the right side of the builder.

Product counter.

1. Background color - change color of product counter.
2. Position - change position of product counter.
Edit view shop cart button style.
Add to shop cart button has exactly the same features as a regular button. If you still don't know how to edit it, read an article on button element in WebWave.