Kup stronę 60% Taniej
BLACK MONTH
BLACK MONTH
Do końca 2 DNI : 2 GODZIN : 2 MINUT : 2 SEKUND
Categories.
WebWave drag and drop website builder lets you create unique websites. You can build your website from scratch by starting with a blank page, or choose various website templates from our free collection and modify them according to your needs. With WebWave website builder, you have a complete website design and hosting system at your fingertips.
This website was created with WebWave.
Find us online
Contact.
Email us at:
contact@webwave.me
Or use the chat (Mon-Fri)
Website builder.
Offer.
Useful articles.
E-mail in WebWave
In this tutorial, we have provided all the necessary information on how to handle mailboxes for the domain you create with our service. Remember, for the mailbox to work, your domain should be redirected with NS records or separately with MX and SPF records.
Attention! - we recommend not to use the mailboxes created in our service as a username in the Webwave service - if one of the services expires, the mailbox will not work, making it impossible, for example, to reset the password.
Content:
How to change the mailbox capacity
Server details needed to configure your email client
Redirection of mail from another operator to our mail servers
Create a mailbox.
1.Sign in to the Webmaster's Panel
2. If you don't have your domain connected to the website yet, set your Web address next to the website thumbnail. Link your domain or register a new one.
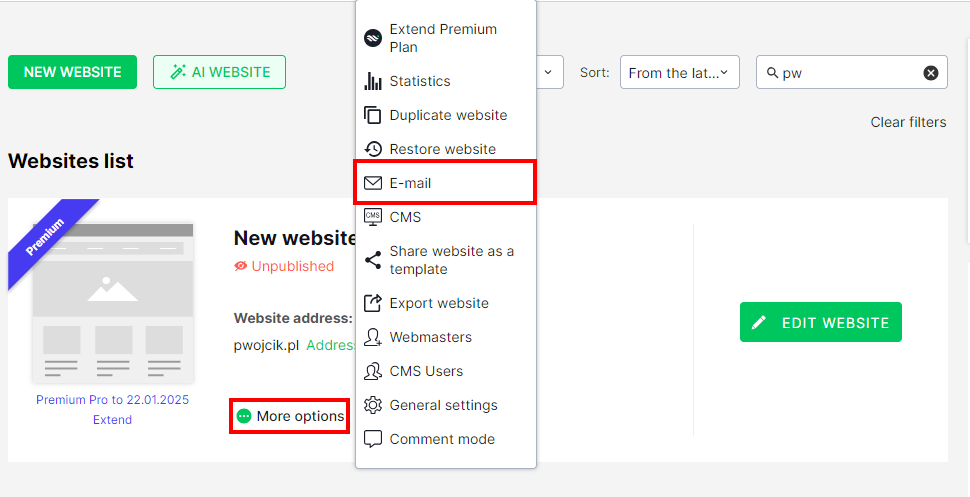
3. Now select "More options" and "E-mail"
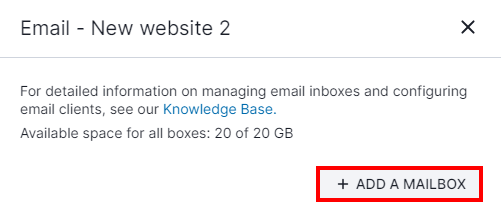
4. Press button "ADD A MAILBOX"
5. Add a new e-mail account and type your e-mail address, password and storage capacity, then press "ADD".
Reset mailbox password.
1.Sign in to your Webmaster's panel.
2. Next to "More" options enter "E-mail".
3. Choose a mailbox to reset its password and enter its settings.
5. Type a new password and change it by clicking x.
Sign in to your mailbox.
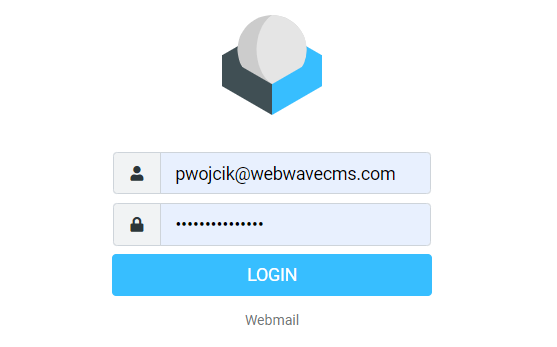
When you activate your mailbox in website builder WebWave, you will be able to access it via webmail by adding the webmail to your website URL.
Method 1: add /webmail to your domain name, for example: yourdomain.co.uk/webmail.
Method 2: log in using our mail server address: mail.webwavecms.com
Method 3: log in using our address: webwavecms.com/webmail
In the "Username" field type your email address, in the "Password" field type your mailbox password.
How to change the mailbox capacity.
Each website created in the WebWave website builder that has an active premium package receives the appropriate number of total capacity on the mail server:
- Starter Plan: 1GB
- Pro Plan: 3GB
- Business Plan: 20 GB
However, this does not mean that you can only have one mailbox for each plan. You can set up a different number of mailboxes for packages:
- Starter Plan: 1 mailbox
- Pro Plan: 3 mailboxes
- Business Plan: unlimited number of mailboxes
You decide exactly how much space you need on the selected mailbox. Below I will show you how to change the capacity of mailboxes yourself:
1. Log in to the Webmaster Panel. Next to the selected website, click the More options> E-mail button.
2. A panel with a list of available mailboxes will appear. On this panel, hover your mouse over the selected mailbox and click the green circle with three dots, which leads directly to the management of the selected mailbox.
3. By clicking the "Edit" button, you go directly to the place where you can set the capacity of your mailbox or change the password to the mailbox.
4. Enter the required value in the field under the "Storage Capacity (GB)" and close the window by clicking the cross in the upper right corner. The box capacity will automatically update to the selected size.
Server details needed to configure your email client.
To configure your local mail application (like Outlook etc) to access your email account in WebWave you will need to add a new mail account in your application add the following data to the email account settings. Remember to enter the full email address of your WebWave mailbox into the login field like yourname@yourdomain.com as an example. If you have an Agency Account please follow these instructions.
IMAP:
|
mail.webwavecms.com | ||||
|
|
||||
| Port: | 993 | ||||
| Login: |
|
POP3:
|
mail.webwavecms.com | ||||
|
|
||||
| Port: | 995 | ||||
| Login: |
|
SMTP:
|
mail.webwavecms.com | |
| Encryption: | SSL/TLS | |
| Port: | 465 | |
| Login: | yourname@yourdomain.com | |
| Server requires authorization: |
Yes |
Optionally, we can use a connection via SMTP with a different encryption and port, this connection most often works when connecting your mailbox to the Thunderbird mail client.
|
mail.webwavecms.com | |
| Encryption: | STARTTLS | |
| Port: | 587 | |
| Login: | yourname@yourdomain.com | |
| Server requires authorization: |
Yes |
Below are detailed instructions, how to configure the most popular e-mail clients.
Redirection of mail from another operator to our mail servers.
1. Export your messages from your current mail carrier. We described exporting messages in this tutorial: "Import and export e-mail".
2. After exporting your messages, set up MX and SPF records with your current domain operator for the mail service.
| Name | Record Type | Value | TTL |
| @ | MX | mail.webwavecms.com | 3600 |
| @ | TXT | v=spf1 include:spf._cname.webwavecms.com -all | 3600 |
| default._domainkey.(domain name). | CNAME | dkim._cname.webwavecms.com | 3600 |
| _dmarc.(domain name). | CNAME | dmarc._cname.webwavecms.com |
3600 |
3. Once the mail is redirected to our servers.
c) import the downloaded messages into your mailbox.
Restoring deleted messages.
To restore deleted messages in your mailbox, you need to purchase a premium plan for the next year. This change resulted from the fact that during message restoration, our programmers are involved, who perform message restoration during the main tasks.
FAQ.
Q: Is there an additional charge to increase the available box capacity limit.
A: No, there is no additional charge to increase the limit; instead, we only increase the limit for a site with an active Business plan.
Q: What services are required for proper operation of mailboxes.
A: For proper operation of mailboxes, an active premium plan and an active domain, redirected to our mail server, are required.


