Kup stronę 60% Taniej
BLACK MONTH
BLACK MONTH
Do końca 2 DNI : 2 GODZIN : 2 MINUT : 2 SEKUND

Categories.
![]()
WebWave drag and drop website builder lets you create unique websites. You can build your website from scratch by starting with a blank page, or choose various website templates from our free collection and modify them according to your needs. With WebWave website builder, you have a complete website design and hosting system at your fingertips.
This website was created with WebWave.
Find us online
Contact.
Email us at:
contact@webwave.me
Or use the chat (Mon-Fri)
Website builder.
Offer.
Useful articles.
Image grid
In website builder WebWave Image grid is similar with functionality to a photo gallery. The difference between them is that photos are presented in slightly another way. In this tutorial you will find out how to make a website with an effective image grid.
Add Image grid to your website
Change photos order in image grid
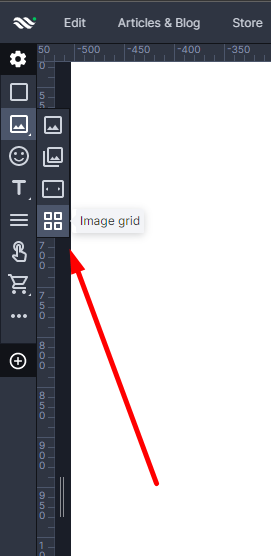
Add image grid to your website
In order to add image grid to your website, select Image icon from the toolbar on the left side of the builder and choose the last icon.
Next click right mouse button on image grid then choose option "Change images". From "My images and files" select pictures that you want to show up on image grid by clicking on them and clicking Add to images grid. If they are not in "My images and files" yet, add them from your hard drive by clicking "Select files" on right top corner of images menager.
Change image grid size
Change image grid size the way you want to and photos will proportionally and symmetrically follow.
Image grid minimum size is only limited by its thumbnails. By setting the smallest image grid size all the thumbnails become visible but there is no space between them. If you want your image grid to be even smaller, change thumbnails size.
Change image grid thumbnails size
After clicking on your image grid you will able to set in pixels image grid's thumbnails width and height through the "Image grid size" section in the "Settings panel → Element".
You can also choose the way thumbnails will be displayed in the image grid. Choose crop type. "Crop" means that an image will fully fit the image grid and will get cropped. "Fit" means that the whole thumbnail will be displayed but it might not fill out the whole space.
Image grid settings
After clicking on Image grid you will see "Image grid settings" in the Settings panel.
You can set there:
- Images in a row - shows how many images displayed are displayed in a row.
- Image spacing - shows the vertical and horizontal distance from one image to another image
- Show titles - indicates whether the titles should be displayed under the photos.
- Thumbnails animation - after ticking that box image grid thumbnails will slightly enlarge when a user hovers over them.
- No image compression - after ticking that option the image grid photos will not be compressed when published.
Layout
You can also change the layout of your Image grid in the item settings. You can choose between:
- Fluid - you can change the distance between elements and the height of the images

- Masonry vertical - you can change the space between the images and the appearance by changing the order of the images

-
Classic layout

Add photos to Image grid
In order to add photos to image grid, click on it and select "Edit content" from image grid settings in Settings panel.

On the top of a new window select "Media library", choose photos and press "Add image grid" at the bottom of the window.
More about media library read here.
Removing photos from image grid
In order to remove photos from image grid, click on it and select "Edit content".
Select a picture which needs to be removed and in "File details" choose "Remove".

Change the photos order in image grid
Click on image grid and select "Edit content".
In this window select a photo, drag and drop it in a place where you want it to be.
Click action on single image
Select the image grid, and then in the "Edit" section, select "image".

Click on the specific image which you want to set the click action, then in the settings panel go to the "Click action (link)" section and select the action you are interested in.
